The Digital Workshop Blog has moved

8 Jun

Thanks for visiting the ship’s website! We haven’t shut down our blog operations, but rather we have moved all of our efforts into one main blog. This is to ensure that the experience for you, the guest, is one that is slightly easier because of more frequent posts, fresher content, and knowing that everything is in one great place.

The URL for the new website is: http://haldigitalworkshop.wordpress.com/

At this site you’ll find new content, great feedback from all of our Techsperts, as well as useful links like Handout Downloads, and great information from Windows. Thank you all for your support and for following along with the Digital Workshop.

Photo Fuse!

29 May

Hello Everyone,

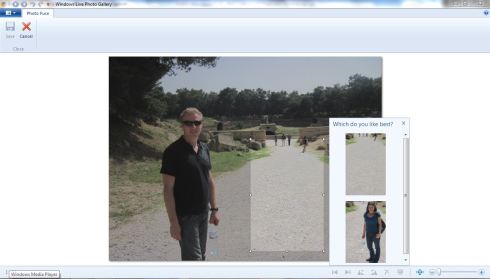
     Kristin here, reporting back from the Digital Workshop onboard Holland America’s MsEurodam wanting to show you something fun and exciting from Windows Live Photo Gallery called Photo Fuse.  Photo Fuze is a feature on the 2011 version of Window’s Live Photo and allows you take multiple overlapping photographs and get the best images from each of the pictures that you have fused together. 

     Example,  my friend and I love getting off on the ports together but sometime we don’t want to bother people to ask them to take a photograph of us or there is actually no one around to take a photo of us.  Therefore, we use the photo fuse to make it look like we were in the same picture.

 As you can see, two different pictures.  But simply by opening Windows Live Photo Gallery.  I can select those two pictures and tell the program to fuze them together.

Then the program will align the photos and give me a base to work with. I will make a square around the area that I was located in for the second picture and the program will ask me which do I like best? Obviously I want the one that has myself in the picture. 

After that, I get my brand new photo that has both of us in the picture together.

I hope you’ve enjoyed this little tip and can apply it to your daily picture-taking lives. 

Cheers from the Eurodam,

Kristin

Techspert for the Digital Workshop powered by Windows

A Special Visitor in the Digital Workshop

11 May

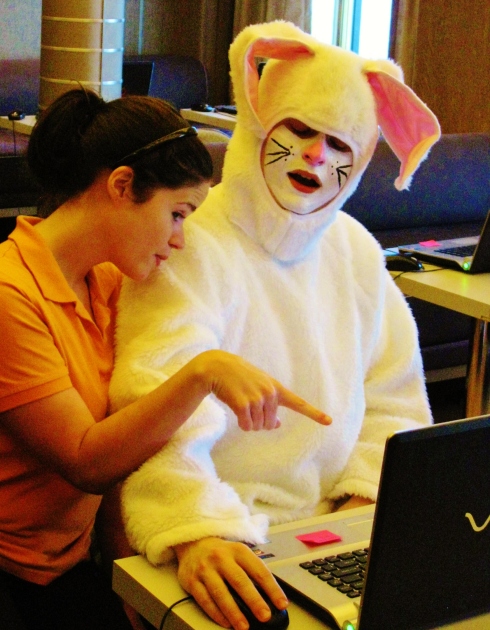
Everyone can learn something new in the Digital Workshop aboard Holland America.  Even if that someone happens to be a rabbit who likes to give out eggs on Easter!

HAPPY EASTER!


The Easter Bunny visits the Digital Workshop

New Techspert Aboard the Eurodam

18 Apr

Hello everyone,

 My name is Kristin and I am the new Techspert aboard the Eurodam.  I have previously “techsperted” on the MsRyndam, Volendam and Oosterdam and I am now so excited to be apart of this new ship.  Our adventures during my stay will take us across the ocean to Europe where we will be spending a few weeks in the Mediterranean, then heading to the Baltic for the remainder of the season, crossing back over to New England and then ending up in the warm and sunny Carribbean.  Throughout my time here I will be bringing you insights and tips about all kinds of technology and programs as well as posting some fun blogs about some of the Eurodam’s adventures and highlights. 

Happy travels,

Kristin

Techspert/ Eurodam of the Digital Workshop Powered by Windows

Out of the Blue

28 Dec

A frequently-overlooked menu in Windows Live applications can be found with the little blue icon in the upper left corner, next to the “Home” tab. It’s not labeled with a word, but it is the equivalent of what used to be the File menu found in most Windows applications. There are several useful functions on it, such as Save, Print, Import and Options. 

In Windows Live Photo Gallery, the blue menu includes an “Include Folder” selection which tells Photo Gallery to add another location to its list of folders. There’s also a selection that allows you to burn selected photos to an optical disk.

The blue menu in Windows Live Movie Maker has selections that allow you to save or open a movie project file or import additional videos from a camera.

Most blue menus include an “Options” function, allowing you to customize the behavior of the application.

And, for those occasions when you’d like to actually print out a photo, you can find “Print” on the blue menu.

Check it out!

Happy Holidays from the Caribbean!

13 Dec

Hi Everyone!

I’m John, the new Techspert aboard the beautiful ms Eurodam, and it’s a real pleasure to be here. It’s only been a couple weeks, but I already feel at home, thanks to my friendly crewmates as well as the terrific guests that have joined us.

We’ve been having a lot of fun in the Digital Workshop, learning about all the great things that can be done Windows Live Essentials software. And it’s hard to believe that it’s all free!

One of the most impressive features is Photo Gallery’s Photo Fuse which allows you to combine the best elements of a group of similar shots into one perfect photo. This will come in especially handy with the holidays coming up, where you’ll be taking group pictures of family and friends. Sometimes, it’s not easy to get everyone looking at the camera or not blinking or all smiling, so all you need to remember is to take several shots of the group. Take the first one and then ask them to hold the pose while you take another and then another. You can take up to 10 of these shots and then, with Photo Fuse, select the best elements of each one to combine into one perfect portrait of your family and friends.

It’s really easy. Go ahead and try it!

– Import the sequence of photos from your camera’s memory card into Windows Live Photo Gallery.

– Select them all and then switch to the “Create” ribbon up at the top of your screen. From the Create ribbon, simply choose “Photo Fuse.”

– Windows Live Photo Gallery will then present you with a screen where you can draw a box around a person in the group.

– Once you draw that box, you can choose from a list the one pose of that person you like best.

– After you are satisfied with the way everyone looks, click on the “Save” icon at the top of your screen, give it a name, and you’re done. It’s just that simple!

Now, every holiday group shot will be a perfect one.

Warmest holiday wishes to you all!

PC keyboard shortcuts that save you time

10 Nov

I have received many questions from Digital Workshop guests regarding some common keyboard shortcuts available in Windows programs.  The following list includes a few of the ones I use frequently, with the “Bottom row” shortcuts being the ones I consider essentials.  You can also click on the article link for an article from the Microsoft kb (knowledge base of articles).

http://support.microsoft.com/kb/126449

Top row on the keyboard:

  • CTRL+R: Refresh (also can press F5 key on the function row)
  • CTRL+T: New Tab
  • CTRL+Y: Redo
  • CTRL+U: Underline
  • CTRL+I:  Italics
  • CTRL+P: Print

Middle row on the keyboard:

  • CTRL+S: Save document

Bottom row on the keyboard:

  • CTRL+Z: Undo
  • CTRL+X: Cut
  • CTRL+C: Copy
  • CTRL+V: Paste
  • CTRL+B: Bold
  • CTRL+N: New (window)

Hope you find these time savers to be as valuable as I do.

– Trisha the Techspert on the ms Eurodam